Fixing Visual Studio Intellisense in MVC Views


Hi folks,

long time ago since my last post. Hard working all the time to see happy customers with a great experience. 😉

But that post is a short one and of course as a clean developer you don’t want to have intellisense problems in your environment within MVC Views!!!

Sean Holmesby figured it out: http://www.seanholmesby.com/fixing-visual-studio-intellisense-in-sitecore-mvc-views/

But you don’t need all the Configs in the App_Config folder, that’s the core of this post. Always use a less configs in your environment as you can. Sitecore upgrades become harder as more configs you have to upgrade.

So, reduce it to the max, you need:

  • the /Views/web.config
  • the /App_Config/Sitecore.config
  • the /web.config

… in your Visual Studio Project.

When you include the /web.config in your project you will see some more errors because some dll’s are not found. I always reference all this missing dll’s in my solution because I like the “zero warning policy” 😉

Happy configuring

Dirk


Advertisement

New Sitecore Website released – www.vega.com


Recently my company has released the biggest sitecore website we’ve ever done! Visit Vega Website to take closer look!

Here are a few statistiks:

  • 18 country specific Websites (trees) in a single sitecore instance
  • 248 configured sites
  • GeoIp Detection and redirection in country specific tree
  • 56000 Downloads
  • more than 7000 products
  • 5 scheduled tasks to import data
  • Document, product and fulltext search indexes
  • and many many more!

The website has a great performance give it a try! 😉

Regards Dirk

Web Forms for Marketers (WFFM) ‒ Part 3 ‒ Multipart Form, Custom Save Action and a Summary Page with a Custom Validator


Put it all together!

The Registration form consists of three steps. In the first step you can choose a seminar and participants. In the second step you have to fill out address details and at least the third step is a tricky summary page with a custom Summary field which inherits from ListControl, displaying the title of the seminar, all participants and the final price for all the persons.

Step 1

Step 1

Step 2

Step 2

Step 3

Step 3

Now, we know how the form looks like. But there are a lot of things we should take a closer look! 😉

The topmost question is: How to do a multi step form on a single page? There are a few examples in the web where each step has a success page (the next step) Multistep forms using WFFM (webforms for marketeers)

That wasn’t a solution for me, because we have to stay on the current page, there are several seminars on the page in different categories. We can’t expect from the customer to create three success pages for each seminar… that would be hundreds of pages!

Much better!! We create a custom SuccessRedirect-Pipeline and patched it before the Sitecore.Form.Core.Pipelines.FormSubmit.SuccessRedirect-Pipeline.

Configuration

<configuration xmlns:patch="http://www.sitecore.net/xmlconfig/">
    <sitecore>
        <pipelines>
            <processMessage>
                <processor type="Project.Infrastructure.Pipelines.Form.ProcessSeminarMessage, Project.Infrastructure" patch:before="processor[@method='SendEmail']"/>
            </processMessage>
            <successAction>
                <processor type="Project.Infrastructure.Pipelines.SuccessRedirect, Project.Infrastructure" patch:before="processor[@type='Sitecore.Form.Core.Pipelines.FormSubmit.SuccessRedirect, Sitecore.Forms.Core']"/>
            </successAction>
        </pipelines>
    </sitecore>
</configuration>


SuccessRedirect-Pipeline

public class SuccessRedirect : ClientPipelineArgs
{
    private const string RegistrationFormularAnchor = "#SeminarRegistrationContainer";

    public void Process(SubmitSuccessArgs args)
    {
        Assert.IsNotNull(args, "args");
        if (args.Form == null)
        {
            return;
        }
        if (args.Form.ID != ItemIds.Forms.SeminarRegistrationStep1 && args.Form.ID != ItemIds.Forms.SeminarRegistrationStep2)
        {
            return;
        }
        var url = GetRedirectUrlForRegistrationFormular(args);
        if (string.IsNullOrEmpty(url))
        {
            return;
        }
        args.AbortPipeline();
        WebUtil.Redirect(url, true);
    }

    private string GetRedirectUrlForRegistrationFormular(SubmitSuccessArgs args)
    {
        var url = LinkManager.GetItemUrl(Context.Item);

        WebUtil.RemoveQueryString(url);

        var parameter = new[] {"step", "2"};
        if (args.Form.ID == ItemIds.Forms.SeminarRegistrationStep1)
        {
            return WebUtil.AddQueryString(url, parameter) + RegistrationFormularAnchor;
        }
        if (args.Form.ID == ItemIds.Forms.SeminarRegistrationStep2)
        {
            parameter = new[] {"step", "3"};
            return WebUtil.AddQueryString(url, parameter) + RegistrationFormularAnchor;
        }
        return url;
    }
 }

The code is quite simple! All three Forms are added in standard values as a rendering. I check the form-id which is submitted and add a parameter to the url like ?step=2. On the Seminar Form  Page I simply have to check the parameter in the url and display the appropriate form.

Such easy is multistep form redirection!!! 😀

Summary Field

All fields which are neccessary for the summary field and the final email-message are tagged:

Tag

In this case we are able to get all Submits (form-steps) from the current Analytics Session and we can use them to show a summary with informations submitted in Step 1. I displayed the chosen Seminar Title included the Seminar Appointment (date and location) and all applicants, also submitted in form step 1.

Code looks like this:

[ValidationProperty("Value")]
public class SeminarFormSummary : ListControl
{
    private const string baseCssClassName = "scfSummaryListBorder";
    private AppointmentModel _appointment;
    private SeminarModel _seminar;
    private IField _seminarRadioListField;
    private string _validationValue;
    protected RadioButtonList bulletedList = new RadioButtonList();

    public SeminarFormSummary(HtmlTextWriterTag tag) : base(tag)
    {
        CssClass = baseCssClassName;
        Inject();
    }

    public SeminarFormSummary() : this(HtmlTextWriterTag.Div)
    {
        Inject();
    }

    [Inject]
    public IFormService FormService { get; set; }

    [Inject]
    public ISeminarSummaryControlFactory SeminarSummaryControlFactory { get; set; }

    public override string ID
    {
        get { return base.ID; }
        set
        {
            title.ID = value + "text";
            bulletedList.ID = value + "scope";
            base.ID = value;
        }
    }

    public override ControlResult Result
    {
        get
        {
           return new ControlResult(ControlName,  _validationValue ?? string.Empty,  string.Empty);
        }
    }

    protected override System.Web.UI.WebControls.ListControl InnerListControl
    {
        get { return bulletedList; }
    }

    [DefaultValue("scfSummaryListBorder")]
    [VisualProperty("Css Class:", 600)]
    [VisualFieldType(typeof (CssClassField))]
    public new string CssClass
    {
        get { return base.CssClass; }
        set { base.CssClass = value; }
    }

    public string Value
    {
        get
        {
            var stringBuilder = new StringBuilder();
            foreach (var listItem in InnerListControl.Items.Cast<ListItem>().Where(listItem => listItem.Selected))
            {
                stringBuilder.AppendFormat("<item>{0}</item>", listItem.Value);
            }
            return stringBuilder.ToString();
        }
    }

    private void Inject()
    {
        var bs = new Bootstrapper();
        bs.Kernel.Inject(this);
    }

    protected override void OnInit(EventArgs e)
    {
        base.OnInit(e);
        bulletedList.CssClass = "scfSummaryList";
        help.CssClass = "scfSummaryListUsefulInfo";
        title.CssClass = "scfSummaryListLabel";
        title.Text = GetTitle();
        generalPanel.CssClass = "scfSummaryListGeneralPanel";
        Controls.AddAt(0, generalPanel);
        Controls.AddAt(0, title);
        generalPanel.Controls.AddAt(0, help);
        generalPanel.Controls.AddAt(0, bulletedList);
    }

    private string GetTitle()
    {
        var seminarTitle = string.Empty;
        if (_seminar != null)
        {
            seminarTitle += string.Format("<h2>{0}</h2>", _seminar.Title);
        }
        if (_appointment != null)
        {
            seminarTitle += string.Format("<h4>{0}, {1}</h4>",
            _appointment.DateTimeFrom.ToLongDateString(),
            _appointment.Location);
        }
        seminarTitle += string.Format("<h6>{0}</h6>", Translator.Translate("Teilnehmer"));
        return seminarTitle;
    }

    protected override void OnPreRender(EventArgs e)
    {
        base.OnPreRender(e);
        title.AssociatedControlID = null;
    }

    protected override void InitItems(ListItemCollection collection)
    {
        var formStep1 = FormService.GetSubmit(ItemIds.Forms.SeminarRegistrationStep1, AnalyticsTracker.SessionId);
        if (formStep1 != null)
        {
            _seminarRadioListField = FormService.GetField(formStep1, new Guid(FieldIds.Forms.SeminarRegistration.Seminars));
            if (_seminarRadioListField != null && !string.IsNullOrEmpty(_seminarRadioListField.Value))
            {
                GetAppointmentAndSeminar(_seminarRadioListField.Value);
            }
        }

        if (_seminar == null)
            return;

        var participantsCollection = SeminarSummaryControlFactory.CreateParticipantsListItemCollection();
        base.InitItems(participantsCollection);
    }

    private void GetAppointmentAndSeminar(string value)
    {
        var context = new SitecoreContext();
        _appointment = context.GetItem<AppointmentModel>(new Guid(value));
        _seminar = (_appointment != null) ? context.GetItem<SeminarModel>(_appointment.ParentItem.Id) : null;
        _validationValue = value;
    }
 }


Web Forms for Marketers (WFFM) ‒ Part 2 ‒ Show/Hide Fields with Rules


Well, sometimes customers have very special requirements. In this case the customer wants to show or hide applicants for a seminar dynamically.

Have a look how this should work:


It is not really possible to add fields dynamically to WFFM, so we decided to add 4 applicant-fields (Salutation, Firstname, Surname) in WFFM.

applicants

The JavaScript for the Add-Applicants-Button and the Remove-Buttons looks like this:

var rightSection = $('div.section-right');
 $(rightSection).on('click', '.scfAddAttendantButton', function() {
     var hiddenFields = $(this).parent().find('div.thirdAvailableWidth[style="display: none;"]');
     $(hiddenFields).each(function(index, element) {
         $(element).show();
         if (index == 2) {
              return false;
         }
         return true;
     });
     if (hiddenFields.length == 3) {
         $('div.section-right .scfAddAttendantButton').hide();
     }
 });

 $('.seminar-registration-content div[class*="name.Nachname"] .remove-button').click(function() {
     var hiddenFields = $(this).parent().parent().find('div.thirdAvailableWidth[style="display: none;"]');
     $(this).parent().prevUntil('div[class*="name.Nachname"]').val('');
     $(this).parent().prevUntil('div[class*="name.Nachname"]').hide();
     $(this).parent().hide();
     if (hiddenFields.length == 0) {
         $('div.section-right .scfAddAttendantButton').show();
     }
 });


Simple isn’t it? 🙂

To show / hide fields when text is entered in any field we use WFFM-Rules:

Rules to show or hide fields when text is entered in a previous field

Rules to show or hide fields when text is entered in a previous field


A short explanation to the field values: ^$ is a regular exprission for string.Empty, ^(?!\s*$).+ is a regular expression for !string.Empty.

The WFFM rules are a mighty way to interact with the form! It is also possible to restore values from the Analytics Cookie:

Rules to restore values from the analytics cookie


Next part is a custom Save-Action. Stay tuned.

Regards Dirk

Web Forms for Marketers (WFFM) ‒ Part 1 ‒ Custom Radio List Field ‒ Data source and Appearance


One of the most powerful Modules in Sitecore is Web Forms for Marketers.
The most powerful forms engine I ever saw!

Installing is quite easy, configuring has some tripping hazard (feel free to contact me, to solve your problems setting up WFFM), but if everything runs as expected you will love it!

I have never, never, never ever build such complex forms without coding!

But stop, sometimes advertising agencies have great designs and great ideas which looks beautiful…. in Photoshop

As a developer, you can despair sometimes on templates you get as a requirement, because for sure the customer likes the well designed templates for his page. 🙂

And sometimes, also WFFM has its limits realizing such templates from Page Editor.

So far so good, here is a scenario, where Design meets coding… where Photoshop meets me :D, because I’m a coding designer and I love to realize such challenges in Sitecore 😉

Okay, enough talking, here we go:

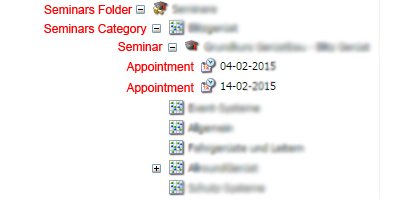
Scenario: The customer has Seminars with any number of appointments, the seminars can have a start date, an end date, a location, a information text and, that’s important later, a fix number of seats.

Structure in Sitecore looks like this:

01_structure_in_sitecore

Visitors can fill out a form to register to a seminar, in fact that data should be saved to Database, one Mail should be send to the registrant, one Mail should be send to the customer and a custom Save Action should count down the available seats, I do that in WFFM!

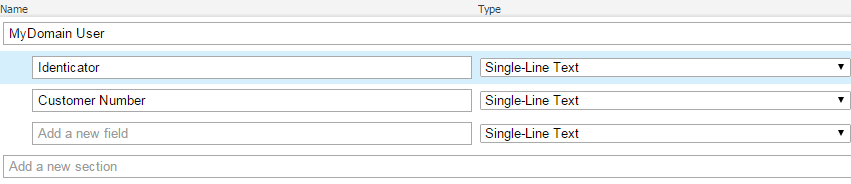
Here is the template how the form should look like:

SeminarsForm

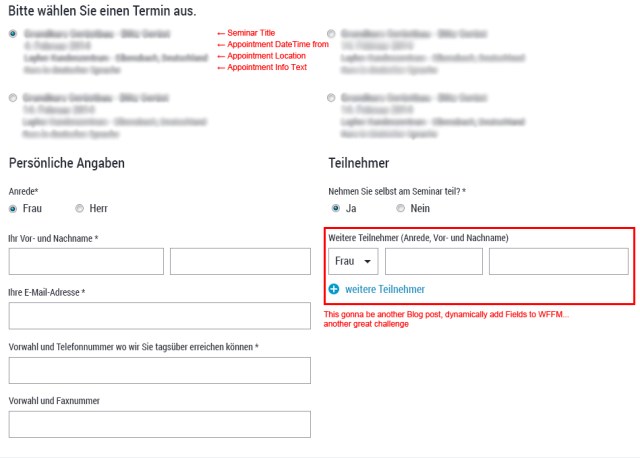
Well, uuuuuhm… nice one … everything is fine and can build by the form designer, except the appointment Radio List above.

There are 2 difficulties to take care about.

  1. WFFM can select items for a Radio List from the tree and by queries. But I want to display the children of the current context item. It took a long time for me to realize that the form doesn’t have the context item, please correct me if I ‘m wrong! Queries like: child::*[@@templateid='<Some Guid>’] works fine in XPath Builder if the path is set to a seminar item… But, start path for queries is /sitecore, you will get no result or you can use descendant::*[@@templateid='<Some Guid>’] and you will get all appointments… I was not able to handle that with queries 😦
  2. In case you have a result in your query… you are able to set a value and a text for the List Item (both from any fields of the item). Let’s look again at the picture above. Title comes from the Seminar itself, the other 3 lines are information from the appointment…. pah! Not possible to display that with functionality of the form designer …

It is possible to display that, even in the form designer. What we need is a new Radio List Field Type and of course what we do next is very specific, and we only need this to display the Seminars Radio List, so we call our new Control SeminarsRadioList, which inherits from Sitecore.Form.Web.UI.Controls.ListControl.

I don’t want to get in deep so I’ll show you just the method to override, and the methods I need to display the text as required in combination with Glass.Mapper. If you are not conform with Glass.Mapper do the following:

  • override InitItems()-Method
  • in InitItems get the context item (the seminar)
  • Create a new method to iterate through the children (appointments) where the available seats greater 0 (in part 3 we count down the seats for each registration as a custom save action!)
  • return a new ListItemCollection, each List Item has a Text and a Value, format the Text as required (Method is self explainable), Value is the Id of the appointment

That’s it!

protected override void InitItems(ListItemCollection collection)
		{
			var context = new SitecoreContext();
			var seminar = context.GetCurrentItem&amp;lt;SeminarModel&amp;gt;();
			var appointmentsCollection = CreateAppointmentsListItemCollection(seminar);

			base.InitItems(appointmentsCollection);
		}

		private ListItemCollection CreateAppointmentsListItemCollection(SeminarModel seminar)
		{
			var appointments = seminar.Children.OfType&amp;lt;AppointmentModel&amp;gt;().Where(x =&amp;gt; x.AvailableSeats &amp;gt; 0);

			var collection = new ListItemCollection();
			var index = 0;
			foreach (var appointment in appointments)
			{
				collection.Add(new ListItem(GetAppointmentText(seminar.Title, appointment), appointment.Id.ToString())
				{
					Selected = index == 0
				});
				index++;
			}
			return collection;
		}

		private string GetAppointmentText(string seminarTitle, AppointmentModel appointment)
		{
			var text = string.Format("{0}<br/>{1}<br/>{2}<br/>{3}", seminarTitle, appointment.DateTimeFrom, appointment.Location, appointment.InfoText);
			return text;
		}

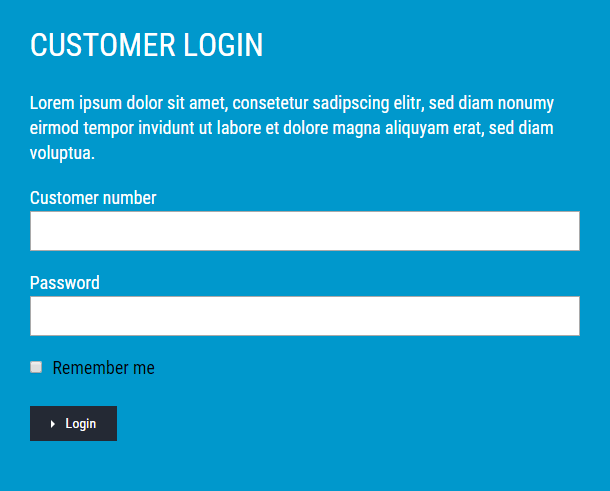
The result looks like this:

AppointmentInRadioList

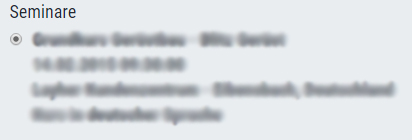
Great, isn’t it? Next step I tried is to check if WFFM recognize my little hook. 🙂

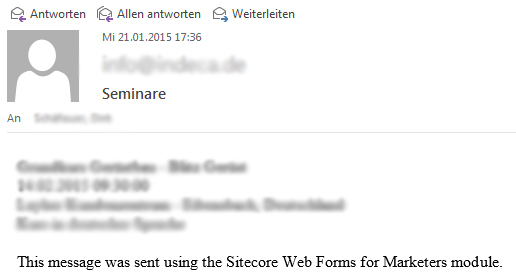
I set of course a “Send Email Message” Save Action to have a look how the fields are rendered in the mail.

But after submit there was only a Guid in the mail of course the Id of the appointment which was set as value of the List Item…

During installation and configuring WFFM I read about a custom pipeline:
How to Configure an Email Message Using the ProcessMessage Pipeline (Page 41 in WFFM Reference)

Following that example, you will be able to get the Seminars Radio List field:

var seminarsField = args.Fields.FirstOrDefault(x =&gt; x.FieldID == FieldIds.Forms.SeminarRegistration.Seminars); //constant Guid to the seminars field ID
if (seminarsField != null)
{
	args.Mail.Insert(0, seminarsField.Parameters);
}

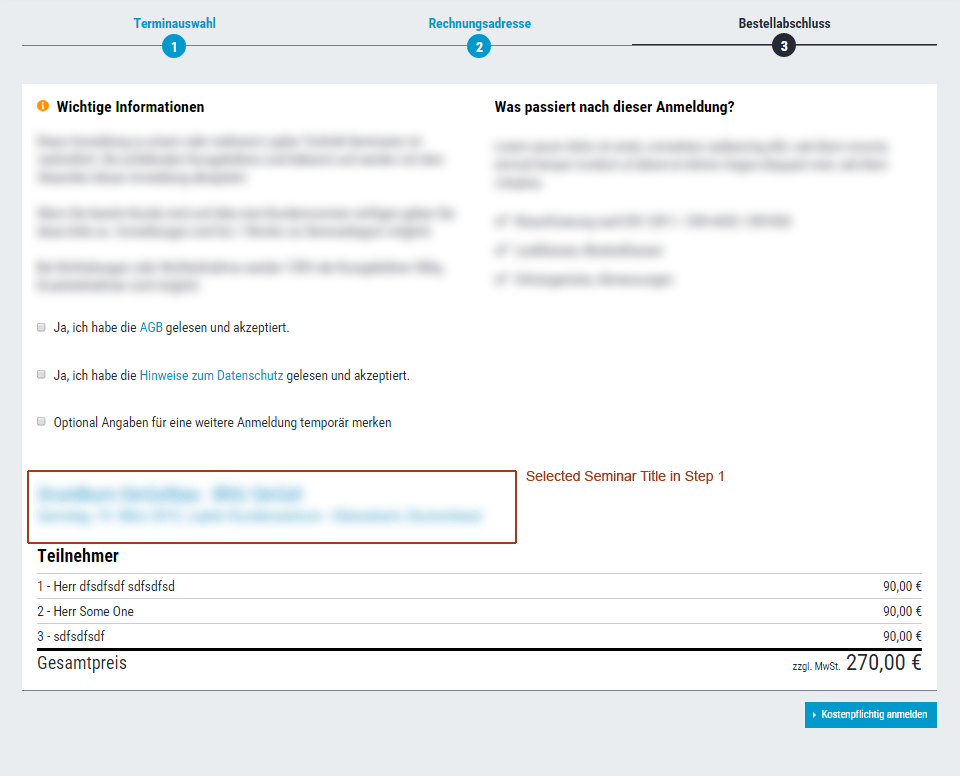
My first thought was: Cool I have the value (Guid) of the appointment, I could take the Guid, fetch the item again and format the mail. But it was easier as expected! In seminarsField.Parameters is exactly the text we formatted in the picture above!!!

The Email looks like this:

email

All information are present. 🙂

In the next step to finish the form I challenge the other difficulty… dynamically show/hide fields WFFM… 😉

Stay tuned!

Best regards Dirk

SeitenKern Translator Module


Well, let me introduce my first Sitecore Module!

SeitenKern Translator is a all-round translator for your website and an important module for all .NET Sitecore developers.

The Translator Module is available on Sitecore Marketplace, you can also download the source code from GitHub, for free!!

Nearly all websites are multilingual and managing translations is always a hard step in development progress.

This module helps you to manage your translations with ease! It builds on the dictionary domain concept (thanks to almighty John West for the explanation), introduced in version 6.6 of the Sitecore ASP.NET Web Content Management System (CMS).

It’s very easy to use! Within 5 Minutes you are ready to take the full advantages of the module, and managing translations is blown out of your mind 😉

The module requires a small set of templates:

  • dictionary folder (for structure only)
  • dictionary domain (item-id with this template should take place in your site config)
  • dictionary folder (the folder for the dictionary index)
  • dictionary entry (at least the entry template)

Keep in mind: The dictionary domain has a fallback domain! If a key is not found in the current dictionary, the translator searches for the key in the fallback domain and returns the translation item if key is found. Else, the translator adds the key to the current dictionary.

If a key was loaded from the fallback domain and you set “AddToAllDictionaries” sometime later, the translator is smart enough to recognize this! It adds the translation to the current dictionary and to all other configured dictionaries where not an item with this key exists!

Give it a try and also a recommendation if you like it!

Best regards Dirk

Sitecore

Sitecore 7, MVC, JSON-Serialization and maxJsonLength


Since Sitecore 7 and MVC there is a problem with JSON-Serialization, if you use aliases and set the data source to a folder with a large amount of items (in my case approx. 2000 items).

I can’t switch to item buckets at the moment, because  a console application fetches products from a customer url , create items and push them to a Sitecore data storage.

If you want to add a new alias and choose a linked item, nothing happened. A short view in console reveals the problem:

Object {statusCode: 500, error: Object}

error: Object
message: "Error during serialization or deserialization using the JSON JavaScriptSerializer. The length of the string exceeds the value set on the maxJsonLength property."
__proto__: Object

statusCode: 500

Hmmmkay! Almighty Google has a lot of hits if you search for the problem, up to custom JsonValueProvider or configuration examples, but none of them worked for me. Together with Sitecore support we found a solution for that: A custom JsonSerializer, a PreprocessRequest-Pipeline and a .config-file which should be placed in App_Config/Include. Here is the code:

JsonSerializer

using System;
using System.Globalization;
using System.Web.Script.Serialization;
using Sitecore.Configuration;
using Sitecore.Diagnostics;
using Sitecore.ItemWebApi.Serialization;

namespace SitecoreContrib.Serialization
{
  public class JsonSerializer : ISerializer
  {
    public string SerializedDataMediaType
    {
      get { return "application/json"; }
    }

    public string Serialize(object value)
    {
      Assert.ArgumentNotNull(value, "value");
      var scriptSerializer = new JavaScriptSerializer { MaxJsonLength = 2097152 };
      var setting = Settings.GetSetting("JsonSerialization.MaxLength");
      int result;
      if (!string.IsNullOrEmpty(setting) && !scriptSerializer.MaxJsonLength.ToString(CultureInfo.InvariantCulture).Equals(setting, StringComparison.InvariantCultureIgnoreCase) && int.TryParse(setting, out result))
      {
        scriptSerializer.MaxJsonLength = result;
      }
      return scriptSerializer.Serialize(value);
    }
  }
}

The PreprocessRequest-Pipeline


using System;
using System.Web;
using Sitecore.Diagnostics;
using Sitecore.ItemWebApi;
using Sitecore.Pipelines.PreprocessRequest;
using Sitecore.Support.ItemWebApi.Serialization;
using Sitecore.Text;
using Sitecore.Web;

namespace SitecoreContrib.Serialization.Pipelines.PreprocessRequest
{
  public class RewriteUrl
  {
    public virtual void Process(PreprocessRequestArgs arguments)
    {
      Assert.ArgumentNotNull(arguments, "arguments");
      try
      {
        var localPath = arguments.Context.Request.Url.LocalPath;
        if (!localPath.StartsWith("/-/item/")) {
          return;
        }
        var context = new Sitecore.ItemWebApi.Context
        {
          Serializer = new JsonSerializer(),
          Version = GetVersion(localPath)
        };
        Sitecore.ItemWebApi.Context.Current = context;
        Rewrite(arguments.Context);
      }
      catch (Exception ex)
      {
        Logger.Error(ex);
      }
    }

    private static int GetVersion(string path)
    {
      Assert.ArgumentNotNull(path, "path");
      var str = path.TrimStart(new char[1] {'/'}).Split(new char[1] {'/' })[2];
      Assert.IsTrue(str.StartsWith("v"), "Version token is wrong.");
      int result;
      Assert.IsTrue(int.TryParse(str.Replace("v", string.Empty), out result), "Version not recognized.");
      return result;
    }

    private static void Rewrite(HttpContext context)
    {
      Assert.ArgumentNotNull(context, "context");
      var url = context.Request.Url;
      var strArray1 = url.LocalPath.TrimStart(new char[1] {'/'}).Split(new char[1] {'/'});
      var length = strArray1.Length - 3;
      var strArray2 = new string[length];
      Array.Copy(strArray1, 3, strArray2, 0, length);
      var str1 = string.Format("/{0}", string.Join("/", strArray2));
      var str2 = url.Query.TrimStart(new char[1] {'?'});
      WebUtil.RewriteUrl(new UrlString
      {
        Path = str1,
        Query = str2
      }.ToString());
    }
  }
}

The .config-file

<?xml version="1.0" encoding="utf-8"?>
<configuration xmlns:patch="http://www.sitecore.net/xmlconfig/" xmlns:set="http://www.sitecore.net/xmlconfig/set">
  <sitecore>
    <pipelines>
      <initialize>
        <processor type="Sitecore.Pipelines.Loader.ShowVersion, Sitecore.Kernel">
          <assemblies>
            <assembly id="SitecoreContrib.Serialization">/bin/SitecoreContrib.Serialization</assembly>
          </assemblies>
        </processor>
      </initialize>
      <preprocessRequest>
        <processor type="SitecoreContrib.Serialization.Pipelines.PreprocessRequest.RewriteUrl, SitecoreContrib.Serialization" patch:instead="*[@type='Sitecore.ItemWebApi.Pipelines.PreprocessRequest.RewriteUrl, Sitecore.ItemWebApi']" />
      </preprocessRequest>
    </pipelines>
    <settings>
      <!-- JsonSerialization.MaxLength
           Specifies the maximum length of JSON strings which can be serialized by the JsonSerializer.
           Value is specified in bytes. Default value: 2097152 (2 MB)
      -->
      <setting name="JsonSerialization.MaxLength" value="2147483647" />
    </settings>
  </sitecore>
</configuration>

Gotcha! From now you can configure the maxJsonLength-property for your needs.

Happy coding!

Best regards Dirk